Cosmetic Dermatology Photography: Lighting, Backgrounds, Shadows and More

By Scott Alten, RxPhoto
Professional-level patient photography is fundamental to the success of aesthetic clinics. For providers of cosmetic dermatological services where incremental or subtle improvements in skin need to be accurately and concisely captured, documenting basic changes and improvements is insufficient—client images must be sharp and polished. Effective photographs can offer your practice a range of benefits, such as:
- Treatment planning;
- Documentation of facial and anatomical features;
- Pre- and post-procedural comparisons; and
- Teaching and education.
Fortunately, today’s mobile devices (smartphones, tablets, etc.) offer quality that is comparable to that of a professional-level DSLR camera, but they are much easier to use. As a result, more and more service providers are capturing patient photographs with their mobile devices, allowing flexibility with respect to where the patient is photographed. If you want to learn more about DSLR cameras in comparison to mobile devices with regard to plastic surgery photography, you can weigh up the benefits and disadvantages here.
One critical issue to be aware of, however, is observing HIPAA compliance if you are using a mobile device to take client photographs. The simplest way to ensure that you are HIPAA compliant is to use a service that stores photos in a HIPAA-compliant cloud server for you. This way, photographs taken are automatically stored on the cloud but never on the device itself. Read more here about achieving HIPAA compliance in your clinic.
The Critical Importance of Lighting in Your Exam Room
The importance of consistent, bright illumination and an evenly lit space cannot be emphasized enough. The lighting in client photographs must be maintained to ensure uniformity, particularly if you are capturing images prior to and following procedures. Inconsistent lighting can veil or obscure treatment progress.
The effect of outside light. Although the photographic quality and capacity of the new generation of mobile phones and devices is outstanding, there is one thing they cannot control: the lighting in a room. This is immensely affected by the natural light outside, and the intensity of the natural light changes between the morning and afternoon. Colors fluctuate and appear warmer in the early morning or late afternoon light due to the low angle of the sun.
If you photograph a patient in the morning, and their next photo is taken in the afternoon, the photographs will be significantly different, impacting on the uniformity of the images. There are three ways to maintain consistency in photographs despite changes in outside light.
- Be scrupulously consistent in the times you photograph. However, this is not always realistic or feasible with busy schedules and clients who require flexibility in their appointment times.
- Convert a windowless room in your office into a dedicated photography room, thus eliminating any alterations in natural light that will affect the photograph. However, in a busy office with high movement of patients, there could be logistical issues with multiple clients requiring photographs at the same time.
- Purchase a blackout shade. For minimal investment, blackout shades provide maximum return. Blackout shades create conditions that mimic a photography studio by providing maximum light blockage and consistent lighting. Each consulting room can easily be fitted with blackout shades, thus creating multiple rooms suited to taking patient photographs.
–Color temperature. Color is measured in units called degrees Kelvin (K) and is integral to achieving successful and consistent lighting. Lightbulbs that produce yellow, ambient light have a color temperature of around 2700 K. While perfect for landscape photographs, this is unsuitable for clinical photographs, as it gives the subject warm overtones and distorts the skin tone.
As color temperature increases from 3,000 K, the color of the light appears yellow and whiter. Temperatures over 6,000 K are referred to as cool colors; the photograph will appear to have a bluish-white tinge. The color temperature of daylight varies, but it is often in the 5,000- – 7,000-K range.
A color temperature of 5,000 K is ideal for medical photography as it gives the perception of daylight with white light, capturing subtleties and details in the photograph with clarity.
Setting up optimal lighting. Excellent, studio-quality lighting does not happen by chance. The best photographs are products of careful manipulation and consideration of light sources to achieve a well-illuminated image. Lighting can come from five main light sources:
- Overhead lights. If you rely on overhead lighting in your clinic as your main light source, be aware of the degree of Kelvins of your light bulbs. (You will need a color temperature of 5,000 K or more.) Also, endeavor to have a light fitting that broadly disseminates light: The broader the light source, the more even the light illumination, which helpfully fills in shadows. Also, be aware that the closer the light source, the softer the light. Photograph patients as close as possible to the source of overhead light. The closer the patient is photographed to a light, the broader the light source in relation to the subject, and the patient’s features will be well-illuminated. Consequently, the further the patient is from the overhead light, the dimmer the light in the photo will be. However, overhead lighting is paradoxical in that the proximity to the light source also increases the likelihood of shadows occurring. The light is brightest on the upper aspects of the person’s head, which creates shadows under the nose and chin as the light falls over the face. Balancing these two variables can be challenging, and for this reason, having an additional source of light or lights on the patient is invaluable: It will eradicate shadows and brighten the image. Read below to find out more about auxiliary or supplementary sources of light.
- Speedlights. Speedlights are larger light units that can be used to flood the photograph with even white light, which is ideal for clinical photographs. Speedlights provide both an enhanced and a more abundant source of light in your photographs, providing the quality of light you would expect to find in a professional studio. Speedlights can be easily synchronized to your smartphone for straightforward use (see here). Speedlights are best used in conjunction with diffusers to help make the light appear softer and more natural in the image.
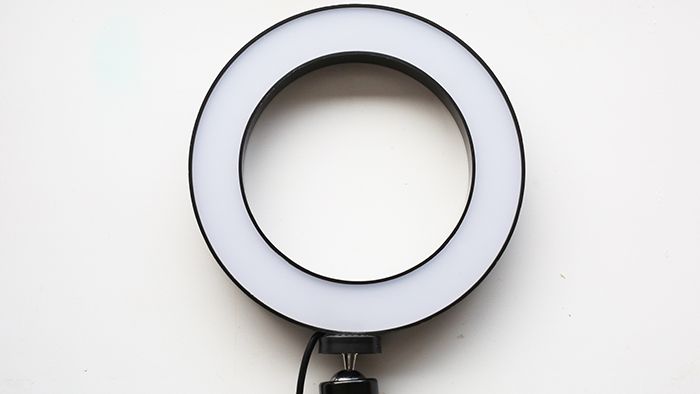
- Ring lights. Ring lights are photographic tools commonly used for portrait photography that disseminate uniform light (in a ring shape) from the camera. A flash tube is wrapped around the camera lens. A ring light is an excellent way to achieve even light in images and eliminate shadows, particularly for photographs where the face or skin is being captured. These days, ring lights are incredibly popular because they can be easily fixed to your smartphone and can dramatically improve the quality of lighting with minimal fuss. They also can be used with a diffuser to soften the light as it is emitted from the flash.
- The flash. Using the flash on your device can overexpose and flush images with bright light, muting subtler details on the skin, such as fine lines and blemishes, or variations in skin color and tone. If you need to capture photographs for facial rejuvenation or resurfacing procedures, it is best to avoid using a direct flash when taking the photo. Soft, diffuse and even lighting will allow you to capture facial redness and pigmentation. In most cases, the flash should be used as a last resort, used only for dark corners or if specific lighting is really needed in a particular area.
- Soft boxes/diffusers. Soft boxes diffuse the flash of a ring light or speedlight, converting the harsh light from the flash into a broader, softer, more even light. Furthermore, soft boxes reduce shadows. Unfortunately, soft boxes are not appropriate to use with overhead light sources, and they can take up space.
Setting Up Your Space to Achieve the Perfect Lighting
Setting up your space to achieve the right lighting is paramount. The ideal setup to photograph a subject should include the following:
- A blue, grey or black backdrop. (See notes on selecting the perfect background below);
- A position marked on the floor, or a floor mat for the client to stand on; and
- The device set up directly in front of the subject; you can use a portable stand to fix the position of your smartphone or tablet.
With respect to additional lighting, there are two options.
- Soft boxes, diffuser and flash; and
- Ring light.
- Attach a ring light to the device. Ring lights offer the quickest and most space-effective method of achieving well-lit images with minimal fuss. Ideally, the light source should be stationed parallel to the subject at the level of the face to flush the photograph uniformly with light.
- If using a speedlight rather than a ring light, it is best to use it with a diffuser so the light disseminated is softened.
Using an Appropriate Backdrop for Your Photos
If you want to improve the professionalism and focus of any clinical photo, investment in a good quality backdrop can offer incommensurate gains. The background of your photographs should be:
- An even surface;
- Neutral;
- Non-reflecting (for example, shiny oil-based wall paint provokes reflections in flashes); and
- Monochromatic, or one consistent color—ideally black, grey or blue.
Sheets or drapes are inappropriate as backdrops, as the undulations in the fabric show wrinkles and shadows, detracting from the photograph. The use of different backgrounds in photos is a common issue that severely affects photo quality: Photographing a client in front of a laser or the wallpaper of the exam room shifts the focus from the patient and the clinical image to the background, which will often also cast irregular shadows.
Standardized backgrounds are simply more professional and more effective, and they guarantee uniformity in your photographs. Most digital cameras use a computer weighting system that will focus partially on the subject and partially on the wall behind them, blending the distances and focusing on neither. A neutral background places the camera’s focus squarely on the patient.
You can purchase white or light blue panels or roll-down shades to fix to the back of the door or wall where you take your photographs of clients.
Another effective option is a collapsible chromakey background. Specifically designed for photography, this backdrop can be hung on the back of a door for when photos are being taken, and then neatly and easily stored away when you are not using it.

Background colors. The three most appropriate and effective colors you can use for a backdrop are blue, black and gray. Here are the pros and cons of each:

Eliminating Shadows
Shadows are caused by unevenly distributed light, and they can obstruct photos and detract from the focus. If you can see a shadow in the viewfinder, you can be assured there will be a shadow in the shot.
- Check for shadows under the nose and neck and, if necessary, reposition the lights to eradicate them.
- Check for shadows cast on the backdrop—if there are shadows, these can often be eliminated by moving the subject further away from the backdrop. Twelve inches of distance between the subject and the backdrop is recommended to minimize these shadows occurring.
The use of an additional flash unit with your smartphone or tablet can cause a tremendous improvement to the lighting and the quality of the photographs you take if your office has dark corners, shadows or a lack of natural light. Used in conjunction with soft boxes, you can almost entirely eliminate any shadows, or at least dramatically minimize them.
Attention to Detail
Unsurprisingly, the small and seemingly inconsequential details also figure in successful clinical photography. Paying attention to the ways in which the patient’s hair, makeup and jewelry impact photographs will help ensure you achieve more standardized and competent images.
- Hair should be tucked away or tied back in such a manner that no facial features are obscured. Any stray strands of hair need to be pinned away from the face or tucked behind the ears. Having some hair clips, ties or bobby pins on hand can be useful.
- Makeup should be removed prior to the photograph, particularly for patients who have undergone dermatological procedures. Obviously, makeup will obscure any gains or improvements made as a result of laser resurfacing, microdermabrasion or skin rejuvenation treatments.
- Jewelry can be distracting and detract from the focus of the photograph; it should be removed.
- Garments or accessories such as brightly colored scarves that impact on the visibility of the area being photographed should also be removed prior to the patient’s photograph being taken. In addition, such pieces can affect the uniformity of images that show response to treatment over time. As much as possible, strive for consistency across the series of photographs that you take.
Pixels
“Pixel” is a contraction of the term “picture element.” It is the smallest element of a digital image, as digital images are composed of tiny squares, similar to a tile mosaic on a kitchen wall. Although digital photographs appear to be smooth and continuous, they are, in fact, compositions of millions of tiny squares, or pixels.
A smartphone camera that boasts 10 megapixels means that each photograph has ten million tiny squares in it. As a result, an image of 10 megapixels will be more detailed and nuanced than a photograph of three megapixels, for example. The iPhone 7 has a sophisticated 12-megapixel camera, whereas the iPhone 6 has an 8-megapixel camera. The iPad Pro boasts a 12-megapixel camera, meaning that photographs of faces will be incredibly clear and detailed.
Purchasing a smartphone or tablet with an advanced camera can significantly improve the quality and sharpness of the photographs you take.
Mobile Device / Digital Zoom vs. DSLR / Optical Zoom
Mobile phones and devices are equipped with digital zoom. DSLR cameras, however, boast optical zoom, and optical zoom trumps digital zoom every time. Optical zoom uses a range of lenses to make it possible for the photographer to see an object in the distance as if it were closer. As these lenses are mechanically complex, they cannot be compacted to fit in a thin smartphone body.
Smartphones and devices are fitted with digital zoom, which is a zoom that blows the image up without actually focusing in or adding more detail. As a result, the image becomes blurrier and appears pixelated. For this reason, using zoom on a mobile device is inappropriate for taking medical photographs, as the quality and precision of the image is compromised. It is better to get closer to the subject to capture detail if necessary.
However, change is afoot: The iPhone 7 and iPhone 7 Plus have two lenses at different magnifications, allowing for some zoom with sharper images. This is not true optical zoom, but nevertheless a definite advance for digital cameras.
Conclusion
Capturing professional photographs of your clients requires measured consideration of the elements that will impact on the composition of your image.
For clinics that do not have the luxury of a dedicated photography room, the addition of several inexpensive tools can go a long way in improving your client images. Purchasing a collapsible chromakey background, blackout shades for windows and a ring light will dramatically improve the quality of your photographs.
It may take some effort in the beginning, but setting up your office space so it can quickly and effortlessly be transformed into a photography studio to accurately and consistently track your clients’ progress is an incredibly worthwhile investment that ultimately will serve to benefit you by improving your business.
Scott Alten is the managing partner of RxPhoto, a medical aesthetics software that helps providers capture standardized and consistent patient photos, go paperless with digital forms and notes, and showcase treatment results, which increases patient conversions and retention.
This post originally appeared on RxPhoto’s website.